Simulating robots in digital twins - a basic ROS2/IsaacSim workflow
11 Jan 2025In this walkthrough, I will describe how I set up my Ubuntu system to simulate a simple search-for-human-and-move robot running on a ROS2 node within NVIDIA’s Isaac Sim. The goal is to go through the entire pipeline, from importing a 3D model of the robot we are interested in, to articulating the joints/motors we wish to manipulate with our ROS node, to finally instantiating a ROS package and writing out the relevant code (in both Python and C++) within a node, and running it in conjunction with Isaac Sim to see if it works!
Motivation
First up, what is simulating robots in digital twins? In simulators like Isaac Sim, Gazebo, MuJoCo and more, we can test robots in high-fidelity environments driven by sophisticated graphics and physics engines. Why we want to do that is - assuming the simulation is sufficiently faithful to reality - primarily because the debug cycle with real robots can be exponentially longer than simple on-computer development, thereby extending development time excessively. Furthermore, testing in real life can lead to wear and tear, as well as unexpected safety issues. From a reinforcement learning perspective, testing in simulation, when sped up and massively parallelized, can also lead to faster training across a larger number of samples.
Workflow framework
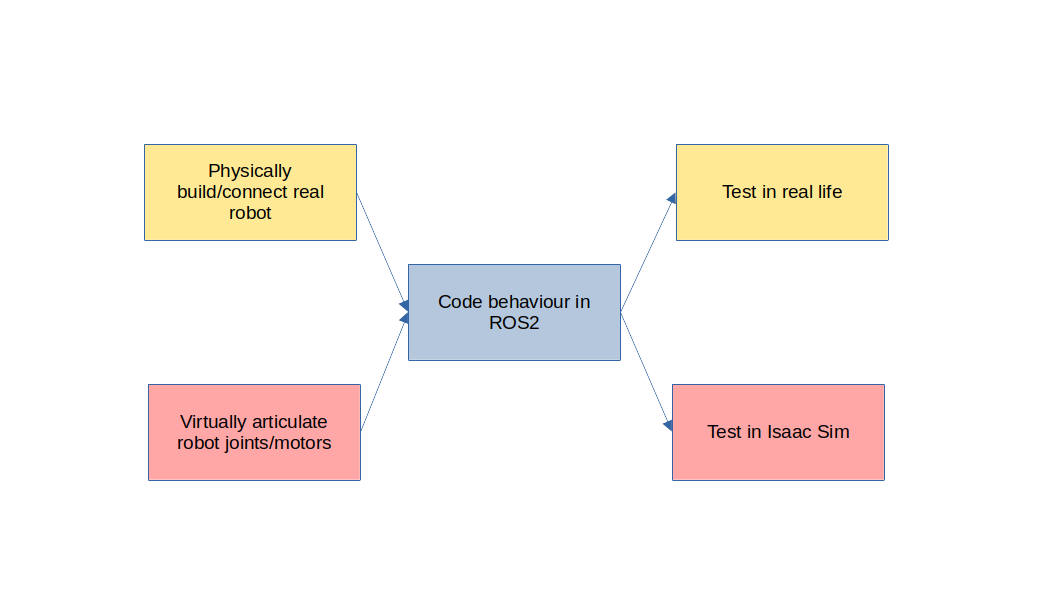
Let’s describe a classic write-and-test workflow (in orange) in real life. Usually, we’re given a template robot with pre-defined routines to control its joints/motors, or we physically build a robot and expose its joints/motors as endpoints to be manipulated by on-board processes. Then, we write some control loop (eg. a manually-defined finite state machine, optimal control or reinforcement learning algorithm, or some combination of all of them) within a ROS2 package composed of various nodes with separated concerns. Finally, we spin up the relevant nodes on the real robot, which publish to topics which manipulate control components, while subscribing to topics which receive data from sensors (eg. RGB camera, lidar).
We want to replace real-life articulation and testing in a simulator like Isaac Sim. For our simulated workflow (in red), we must (1) virtually articulate our robots’ joints and motors, which is primarily done with a visual scripting tool called Action Graphs, then (2) write our ROS2 code as before to actually program control of the robot, then (3) test run in Isaac Sim. This may require extra steps like designing/importing a digital twin environment or assets like humans.
The overarching goal is to articulate our virtual robot as faithfully to a template robot we are provided, or else to build our physical robot as faithfully to our ideal virtual robot, so that we can write a ROS2 package that effortlessly runs similarly whether it’s in the simulation or in real life. This way, once we’ve gotten past the fixed overhead associated with setting up the Isaac Sim environment/assets, we can quickly iterate on the crucial part - the ROS2 / robot control code - in sim, with the eventual goal of minimizing test time in reality.
In this walkthrough…
Now that we understand why we’re doing this, let me describe what I will be going through in this walkthrough.
(1) A brief guide to (compatibly) installing Isaac Sim and ROS2
(2) Importing a .urdf (robot model) to Isaac Sim + tuning + setting up the environment
(3) Articulating the virtual robot’s basic motors in Isaac Sim
(4) Articulating sensors, eg. cameras
(6) Writing ROS2 nodes for a simple detect-and-follow FSM
Compatibly installing Isaac Sim and ROS2
All details for installing Isaac Sim can be found here. I won’t say much about this as it’s quite straightforward. I WILL say, however, that in order for it to be straightforward, the following is EXTREMELY recommended:
- Use Ubuntu 22.04. I tried finagling with Windows and WSL but there’s way too much overhead associated with getting different components to recognize each other. It’s just faster to create a partition for Ubuntu. Do note that you have to use Ubuntu 22.04 specifically because Isaac Sim only supports up to ROS2 Humble, which is not compatible with Ubuntu >22.
- Use ROS2 Humble. As stated before, ROS2 Humble is maximally compatible with Isaac Sim.
- Remember to source ROS before opening Isaac Sim, and take note of install instructions to make sure ROS2 Bridge is working.
source /opt/ros/humble/setup.bash
Environment and asset setup
The relevant official tutorials for this portion can be found here.
Setting up a basic environment
Our robot needs a floor to stand on. If you’ve completed the full workstation installation for Isaac Sim, they provide plenty of environment/human/robot asset templates.
I shall import a basic floor.
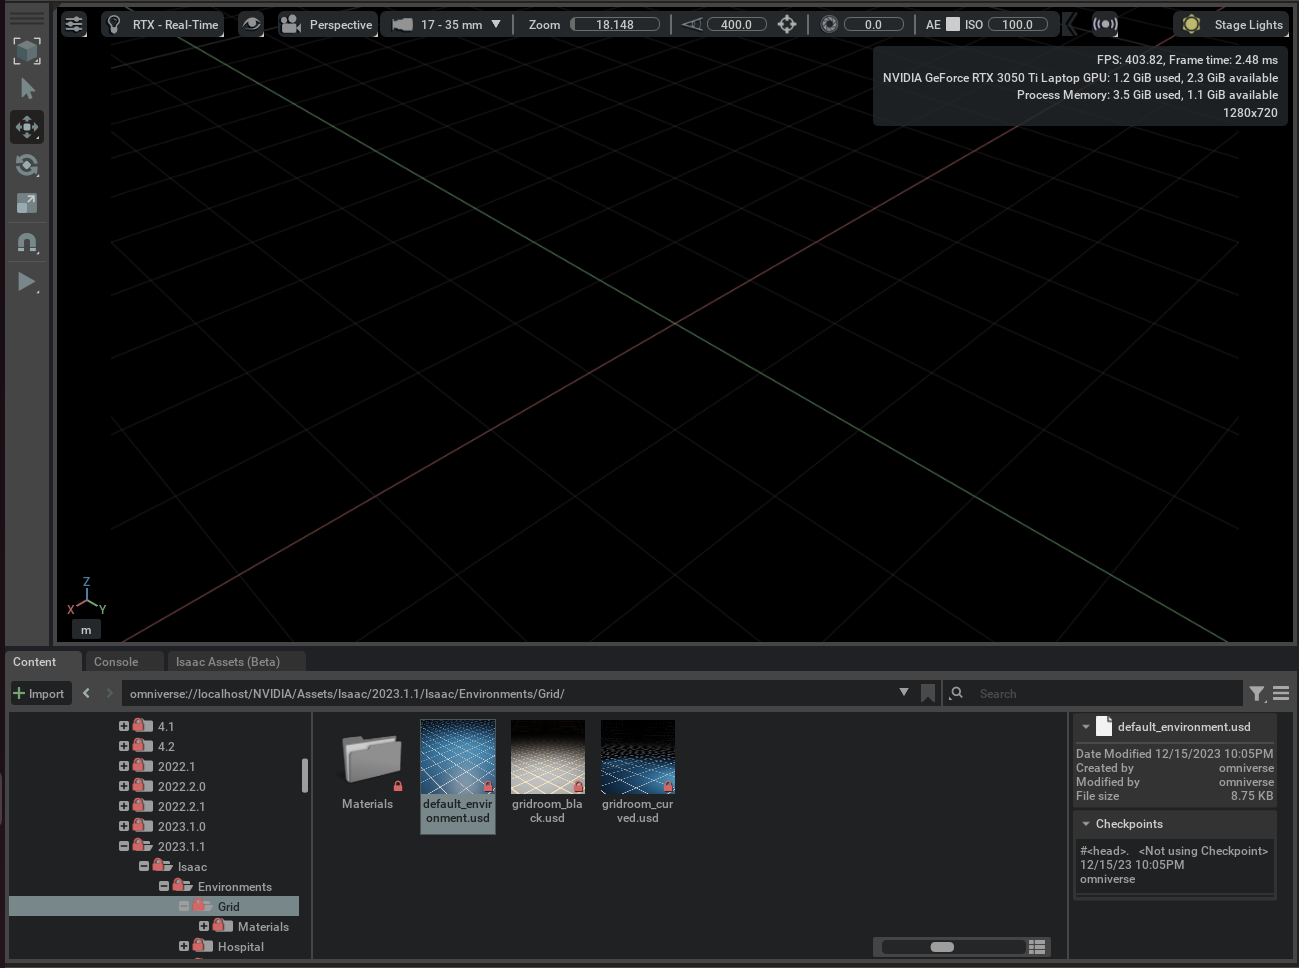
As you can see, in the window in the bottom, you can find lots of default templates in the Omniverse. Please follow the path in the above screenshot (may change from year to year, of course) and drag the default_environment.usd file into the blank space above.
Importing a custom robot
I’m looking to Sim2Real a turtlebot4. Therefore, I’ll have to find a .urdf model online myself.
git clone https://github.com/turtlebot/turtlebot4.git
Now, you’ll find the .urdf file (a 3D model with some added physical modeling for control components like joints/motors) for the turtlebot4 in turtlebot4/turtlebot4_description/urdf/standard/turtlebot4.urdf.xacro.
Isaac Sim only reads .urdf files, so we’ll have to convert this file.
# Update and install converter along with dependencies
sudo apt-get update
sudo apt install ros-humble-xacro
sudo apt install ros-humble-irobot-create-control

# Follow this format
ros2 run xacro xacro -o <filename>.urdf <filename>.urdf.xacro
Now, you can drag this .urdf model into your Isaac Sim environment!
Tuning
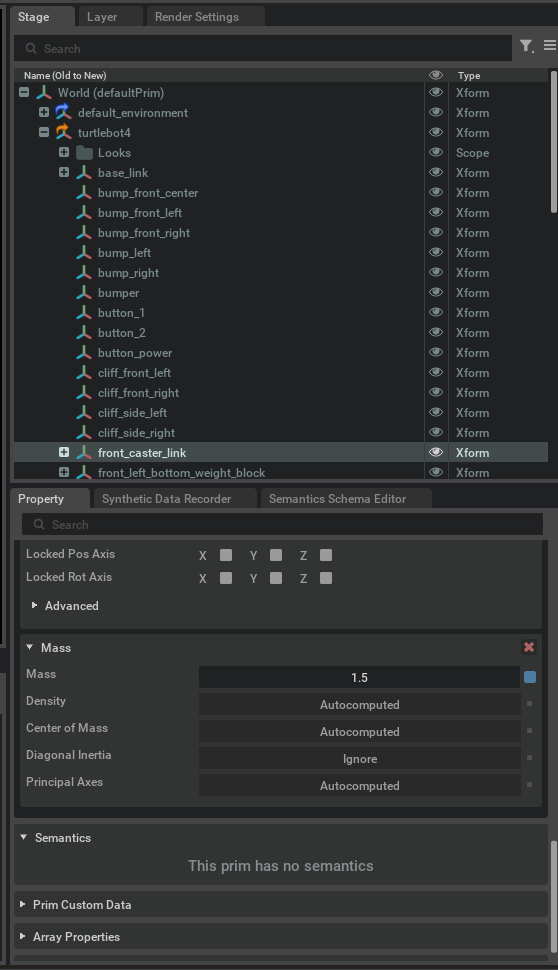
You may have to tune some joints, motors or weights to make sure the robot is balanced/can move appropriately. For this turtlebot4 model, for some bizarre reason, there is a phantom mass in front of the turtlebot4 which helps it balance on the forward/backward axis. I have to increase its mass so that the bot is not leaning backwards.
Selecting the turtlebot4 in the sidebar, go to turtlebot4>front_caster_link, and scroll down the bottom right property window, and set Mass to 1.5.
Articulating robot’s motors
Now that we’ve imported our robot, we will need to articulate its motors. This basically means that we tell the computer that it can control those particular motors, and in our particular case, through ROS2 topics. The main way to do this in Isaac Sim is through a visual scripting tool called Action Graphs, although options are also available to script these using Python. We’ll focus on Action Graphs in this walkthrough since it’s pretty straightforward.
Create an Action Graph in Window > Visual Scripting > Action Graph. Then, add components to look something like this:
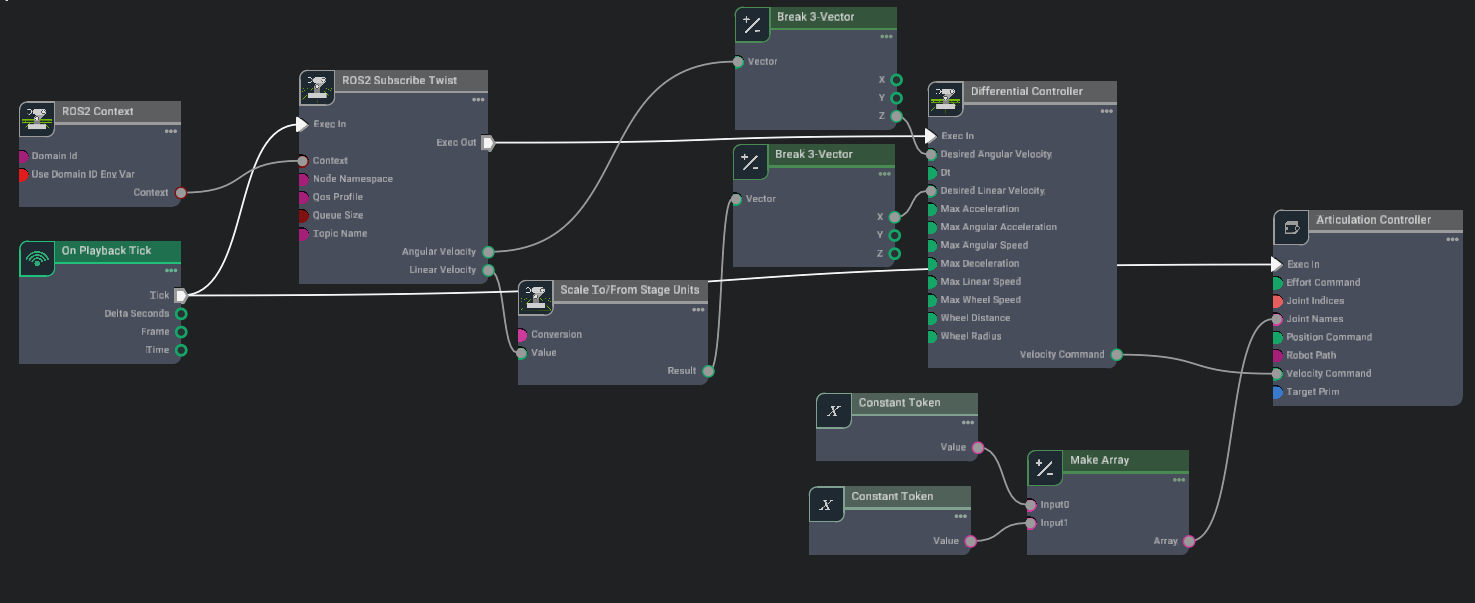
We need to go to the Articulation Controller, pull up its property window, and set the targetPrim to be /World/turtlebot4/base_link. For your own custom imported robot, you will need to set a targetPrim to whatever has an Articulation Root.
Next, we need to go to Constant Token, and for one, set the Value to left_wheel_joint, and the other’s Value to right_wheel_joint. Name may vary depending on your custom imported robot, so just explore a bit.
The idea behind the above adjustments is that the Articulation Controller receives a velocity command from a ROS topic, and converts it to an actual physical action with respect to the relevant robot joints.
Next, in the Differential Controller, we follow the tutorial and set:
maxLinearSpeed: 0.22wheelDistance: 0.16wheelRadius: 0.025
To test everything is working fine, click the play button in Isaac Sim, and run in terminal
ros2 topic pub /cmd_vel geometry_msgs/Twist "{'linear': {'x': 0.2, 'y': 0.0, 'z': 0.0}, 'angular': {'x': 0.0, 'y': 0.0, 'z': 0.0}}"
The robot should be moving forward now.
Articulating robot’s camera
Now that we’ve articulated the robot’s motors, we will need to create a camera which will capture RGB images and publish that to the /rgb topic. Down the line, we will be able to use this image for the purposes of human detection. In turtlebot4’s case, we want to put a camera on the little bracket at the back of the bot.
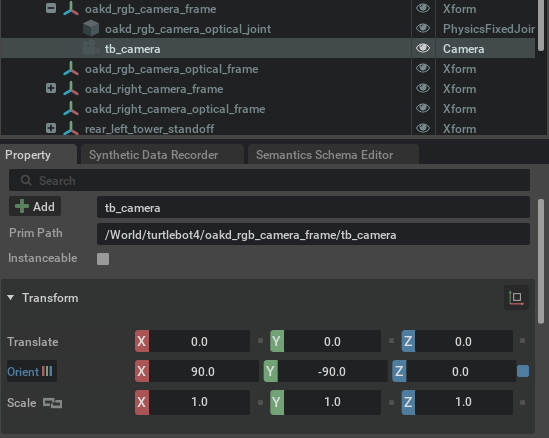
First, create a camera in Isaac Sim by selecing Create > Camera. Then, parent it under oakd_rgb_camera_frame directly. If you’re using a custom robot, I faced quite a bit of problems trying to figure out the correct parent, but just keep going to the camera viewport and checking whether the image looks correct. Also, the camera begins by facing downwards, so to make it face forward you’ll need to change Orient > X = 90 and Orient > Y = -90.
Once we’ve gotten the camera in place, we will next articulate the camera with the goal of getting it to publish image data to the /rgb topic. Create an action graph that looks like the following:

In Isaac Create Render Product, set the target of the cameraPrim to the camera we just created and parented under the bracket above. This connects the sensors to the graph. Then, in ROS2 Camera Helper, set the topicName to “rgb”, and type to “rgb” as well. You can look at the options in the type and find many other options, like depth or bbox.
To test everything is working fine, click the play button in Isaac Sim, and run in terminal
ros2 topic list # check if /rgb is being published
ros2 topic echo /rgb # this should print out many values - they are rgb values for each pixel
Now, our simulated robot is controllable and can observe through its sensors! This is just a basic example, but there are many more components to explore: sensors, like lidar, or controllers, like joints. If you’d like a guide to articulating joints, you can watch this helpful video.
Setting up a ROS2 package
Let’s move on to actually writing a program that observes and controls.
Create your workspace (these folder peculiarities are just ROS conventions you have to get used to):
mkdir hello_robot
cd hello_robot
mkdir src
In this walkthrough, we will be writing primarily in C++. So, here is the code to instantiate a ROS2 package:
ros2 pkg create --build-type ament_cmake --node-name hello_robot_node hello_robot_package
What does a package do? It can contain multiple nodes, and is used to build all your programs consistently in one fell swoop.
Now, whenever you create a package, the first thing you’ll want to think about are dependencies of your C++/Python code. In Python, you know off hand that you’ll need to pip install <package>. In ROS2, this is analogous to doing a sudo apt install <package> and then updating 2 important files: package.xml and CMakeLists.txt (C++) / setup.py (Python).
Obviously you won’t know for sure what packages or dependencies you’ll be using ahead of time, but the basic flow goes like this. Let’s say we want to use geometry_msgs.
First, install the package at hand.
sudo apt install ros-humble-geometry-msgs
Update package.xml, which can be found in {workspace_folder}/src/{node_folder}/:
<depend>geometry_msgs</depend>
Update CMakeLists.txt, if using C++:
# fill this in in the top section, along with the rest of the find_package
find_package(geometry_msgs REQUIRED)

# fill this in after add_executable(...)
ament_target_dependencies(<robot_node_name> rclcpp geometry_msgs)
In my particular case, I am using both Python and C++, so here is my package.xml, and here is my CMakeLists.txt for your reference.
Writing ROS2 nodes for a simple detect-and-follow FSM
Now that we’ve got the legwork out of the way, we want to write nodes which will fulfill a simple purpose: try to find a human, then move towards that human.
A simple FSM looks like:
SEARCH -- if detect human --> FORWARD
SEARCH -- if don't detect human --> SEARCH
FORWARD -- if don't detect human --> SEARCH
FORWARD -- if detect human --> FORWARD
In my case, I choose to write the overall FSM in C++, which is in the main node file {workspace_folder}/src/{node_folder}/src/hello_robot_node.cpp. You can refer to my code here.
I separate concerns by writing the human detection algorithm in Python, which is in a separate folder: {workspace_folder}/src/{node_folder}/scripts/human_det_node.py. You can refer to my code here.
(IMPORTANT!) Basic building workflow in ROS2
Once you’ve copied all that code in, you can now build and run. Here is the basic workflow:
# in your overall workspace folder, run:
source /opt/ros/humble/setup.bash # sources ROS
colcon build # builds all changes in your node code
source install/setup.bash # informs ROS of new dependencies etc
ros2 run hello_robot_package human_det_node.py & # run human detection node while also
ros2 run hello_robot_package hello_robot_node # running the hello robot node
Results in Isaac Sim
Now, you can click play in Isaac Sim, and you should see the following results!
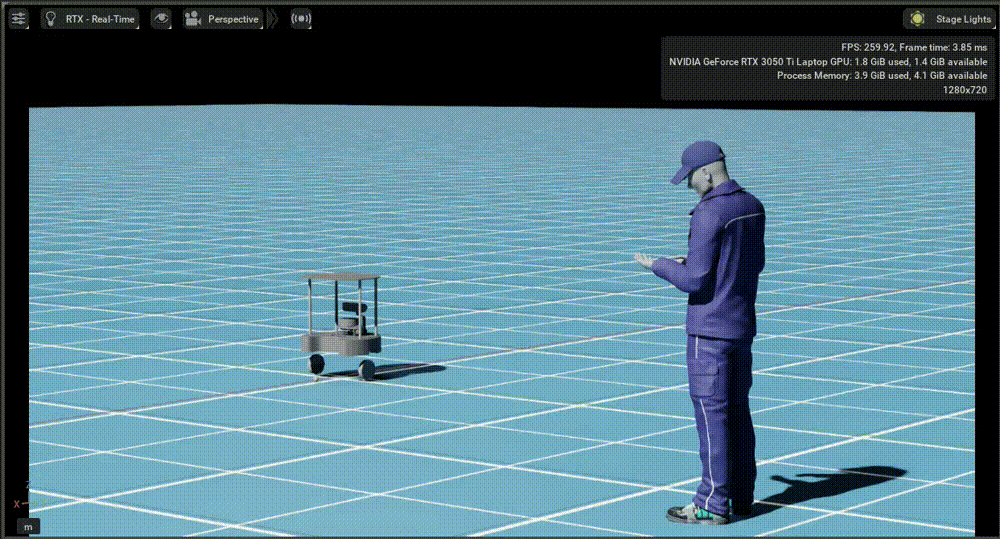
The idea then is that with a successful simulation, we can test it (and future iterations) on a real turtlebot4, and it should lead to similar results as well.
Credits and stuff
Credits to this Youtube video for being a huge guide!